The Dashboard Scheduler allows Infosec IQ Dashboards to be scheduled and shared via email with users inside or outside of your organization. The Dashboard Scheduler is only available with the Infosec IQ Enterprise plan.
Creating Schedules
The Dashboard Scheduler is found under the reports tab in the Infosec IQ admin dashboard. Click on Add New Report to get started. Note that you can only schedule existing dashboards, so be sure to create the dashboards before proceeding.
Content
The Content section is where you’ll select a name for your schedule and identify which dashboards are to be included. The Report Name will appear in the subject line of the email.
Note: Custom Filters are not currently supported.
Settings
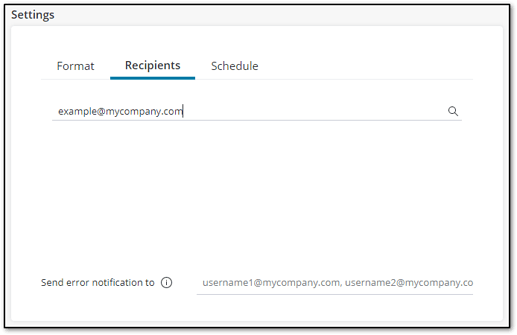
The Settings section is divided into three tabs: Format, Recipients, and Schedule.
Format
The available formats are intended to be used with specific types of data:
- CSV (pivot and table widgets): Used for tables. Note that for pivot tables the Excel option may provide a better experience.
- Excel (pivot widgets): Used for pivot table widgets only. Note that if the data is not a pivot table then there will be no file attached to the Dashboard Scheduler email.
- Excel (all dashboard widgets into a single file): This option will combine all widgets into a single .xlsx file with each widget appearing on a separate tab.
- PDF (dashboard): Outputs the full dashboard. This option is best for dashboards with lots of charts and visuals. Note that if you export a table as a PDF then only the first page of results will be included.
Recipients
Recipients is where you specify who is subscribed to the scheduled email. A recipient can be an IQ admin, or any email address can be entered. You can also optionally specify email addresses to receive error notifications in the event of problems with report generation or sending.
Schedule
The Schedule tab is where you create the cadence for your schedule. You can schedule a one-time run, or the schedule can run at a specified number of hours, days, weeks, or months.
Managing Schedules
Once schedules have been created, they will appear in the list on the main Dashboard Scheduler page. From the list view you can see the following information:
- Report Name
- Dashboard Name: the dashboard(s) included in the report.
- Owner Email: the email of the user who created the report.
- Last Run: the timestamp for the last run of the report. Note that any errors will also be displayed here.
- Priority: this will always be Normal.
- Status: the status of the report right now; most of the time this will say Not Running.
- Enabled: when this is set to On, emails will be sent to subscribers. If this is set to Off then no emails will be sent, but the reports can still be run manually. You can toggle between the two by turning a subscription on or off (see below for more information.)
There are additional options available when clicking the three dots menu at the end of the row. You can Edit, Duplicate, or Delete an existing report, toggle the subscription on or off, as well as manually run the report.

Bulk operations can also be performed when there are multiple reports. When selecting the checkboxes next to the schedules additional options will appear at the top allowing you to delete reports, turn subscriptions on or off, send the selected reports, or cancel the selected reports.


